Brisket in the Electric Roaster
This foolproof beef Brisket in the Electric Roaster recipe slow-simmers a well-seasoned beef brisket in a savory, tomato-based sauce until tender. Keep reading to learn how to choose your brisket at the grocery store and the perfect way to feed a crowd.
I love cooking in my electric roaster oven. If you are looking for more recipes like this, try my Tri Tip in an Electric Roaster or my Prime Rib in a Roaster.

A Quick Look at Brisket in the Electric Roaster
- ✅ Recipe Name: Beef Brisket in the Electric Roaster
- ⏲️ Ready In: 8-10 hours of slow cooking, totally hands-off!
- 👨👨👦👦 Serves: 12 big eaters or 16 light eaters
- 🍽️ Calories: 718kcal
- 💪 Protein: 77g
- 🥣 Main Ingredients: One trimmed 8-pound beef brisket, your favorite beef rub, sliced onions, chili sauce, beef broth, brown sugar, Lipton onion soup mix.
- 💯 Why You’ll Love It: This is the perfect way to cook beef brisket for a big group – so easy, AND it’s convenient for any setting that’s got an electric outlet available.
Creating this easy beef brisket recipe proved to me that my electric roaster is the perfect self-basting environment. It makes brisket that slow-simmers in a flavorful sauce until it’s perfectly juicy, tender, and flavorful. I couldn’t be more pleased with the final outcome, and I think you will be, too!
I’ve said it again and again – my appreciation for the electric roaster is growing. I’ve come to realize that my electric roaster is actually just a giant slow cooker. This has helped me feel less intimidated by it. I have come to see it as my best friend for feeding lots of hungry people.
My confidence continues to climb when using a roaster. I find this so important when you’re serving a big group of people. You want to know that it’s going to be GOOD and the recipe is trustworthy.
From baked potatoes in a roaster to ham in a roaster oven, and everything in between, I’ve been so impressed at the quality of the food that can be cranked out of my electric roaster.
Ingredients and Substitutions
For a complete list of ingredients, see the detailed recipe card below.

- Beef brisket: Purchase an 8-10 pound brisket flat (not a brisket point) that has been trimmed by the butcher. Brisket needs to have some of the fat cap remaining (about 1/8-1/4 inch) to keep the meat moist during cooking. Too much fat can make the final eating experience too greasy.
- Beef broth: I like to use Better Than Bouillon Beef Base Paste to make my broth nice and strong. This is a great ingredient to keep on hand in your refrigerator, and I use it all the time. I like to be able to make exactly the amount of broth I need for a recipe. At whatever strength. Plus, there are lots of flavors of Better Than Bouillon. You’ll find it in the soup section of your grocery store, near the containers of pre-made broth.
- Tomato-based chili sauce: I use Heinz, but use your favorite. You can also substitute 1 1/2 cups of ketchup mixed with 1 tablespoon of cider vinegar.
- Brown sugar: This adds a nice sweetness to the sauce.
- Onion soup mix: I use Lipton Onion Soup Mix to give the brisket sauce a good, savory punch.
Brisket in the Electric Roaster Step by Step Instructions
Step 1: Choose the right brisket. The brisket must be prepared and trimmed so it isn’t too greasy. To learn which brisket is best for this recipe, check the section titled How to Choose a Brisket.

Step 2: Unwrap the brisket. Use your fingers to rub salt and pepper all over the brisket on all sides. Ideally, this step can be done up to 24 hours in advance to allow the brisket to season, but it requires planning! Allow the seasoned brisket to rest, uncovered, at room temperature for 1 hour to relax the meat fibers before cooking.
Preheat a lightly greased electric roaster to 300 degrees F.

Step 3: Place the seasoned brisket into the prepared roaster, fat side up and meaty side down. I used an 18-quart electric roaster for this recipe. If you are using a larger electric roaster, you could likely fit and cook 2 brisket flats (8-10 pounds each) at the same time for a larger crowd.
In a medium mixing bowl, whisk together the beef broth, chili sauce, onion soup mix, and brown sugar.
Gently pour the prepared sauce mixture all around and over the beef brisket in the electric roaster.

Step 4: Bake, covered, for 8-10 hours, or until the internal temperature at the center reaches 200-208 degrees F. when tested with an instant-read meat thermometer probe, and the meat is tender when pierced with a fork.

Step 5: Turn off the electric roaster. Use two large meat/grilling spatulas to carefully lift and remove the brisket to a large cutting board. Tent the brisket with foil and let it rest for 30 minutes while you finish the sauce.
Save this Recipe

Step 6: Allow the sauce to cool slightly, then pour it from the roaster into the strainer of a 6-cup fat separator pitcher.
Wait a few minutes to allow the fats to separate and rise to the top – you will see a visible line where the fat ends and the sauce beneath begins.
Once the fat layer is clearly on top, press the fat separator’s bottom release button to let the sauce escape into a bowl or saucepan. When most of the sauce has been removed from the fat separator, quickly press the release button again to close it. This will leave the fats in the pitcher for disposal.
If you don’t have a fat separator, read my FAQs at the bottom of this post for instructions on how to strain the fat.

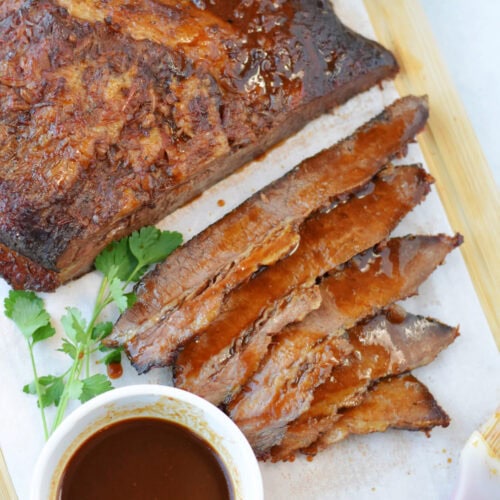
Step 7: Untend the brisket, carving it across the grain into 1/2-inch thick slices, or whatever thickness you prefer. To carve across the grain of the meat, locate the parallel meat fibers that run the length of the brisket. Use a sharp carving knife to slice across them, preferably on the diagonal, shortening the meat fibers as you slice for maximum tenderness.
Return the brisket slices to the electric roaster set to the lowest temperature setting. Shingle the slices on top of one another along the bottom, then drizzle with some of the sauce as desired, or serve the sauce on the side. Cover the electric roaster to keep the brisket warm until ready to serve.
My Recipe Tips
- I do not use a rack inside the electric roaster when cooking brisket. I like the brisket to be fully down in the sauce while it is simmering so the meat can absorb all the flavors of the sauce as it cooks.
- If you have a dry rub or seasoning blend that you are especially partial to, you can absolutely substitute it in place of the salt and pepper in this recipe. I often use my beef tenderloin rub when I season and cook brisket.
- Cooking the brisket in the electric roaster with the fat-side-up allows the fat to render down (into the meat) as it slowly simmers.
- If you want to make a bed of sliced onions over the bottom of the electric roaster before adding the seasoned brisket and sauce, you sure can and this will add an extra layer of flavor. However, keep in mind that you will have to remove these onions from the sauce before defatting it in the fat separator.
How to Choose a Brisket
When developing this recipe for electric roaster brisket, I learned that it’s totally worth it to purchase a good-quality brisket flat that a butcher has already trimmed of most of the fat.
Yes, this will add to the cost of the brisket, but trimming a brisket yourself is not an easy task. Trust me when I tell you this! Let the butcher do this for you.


It’s important for a brisket to have some fat during cooking, since it is a lean cut of beef. However, since the fat cannot run off the brisket as it cooks in the electric roaster (as it can when you are smoking it in a smoker), too much fat will definitely make the brisket a greasy eating experience. Yuck.
I discovered that a brisket FLAT (not a brisket POINT) is leaner and therefore better for cooking in the moist environment of an electric roaster. A brisket flat is also easier to slice into whole slices once it is fully cooked and tender.
There are a lot of electric roaster brisket recipes that call for a full brisket (which includes a flat and a point all in one big hunk of meat). These recipes instruct to leave the fat intact on the brisket during the cooking process. I tried this recipe version myself and learned it yields way too much fat to deal with.
You will find that cooking a trimmed brisket flat in the electric roaster still yields plenty of fat! The fat is strained off with a fat separator after the brisket is fully cooked to preserve the sauce’s integrity.
Brisket in the Electric Roaster FAQs
If you do not have access to a good local butcher shop, sometimes you will find yourself having to trim a brisket on your own. This is best and most easily done if the brisket is partially frozen and you have a very sharp knife.
Trying to trim fresh brisket is a slippery nightmare! Brisket that is frozen about one-third of the way (not solid though) makes this task much easier. A chilled brisket set in the deep freeze for about an hour will partially freeze and be ready to be trimmed.
Trim the fat cap down to about 1/8-1/4 inch thickness using a sharp knife.
Once the sauce in the electric roaster is no longer hot (just very warm), have someone help you pour it into a gallon freezer bag (this takes 4 hands!). Press out the air and seal the bag, then place it in a bowl that will hold it upright.
After a few minutes, you will see the fats rise to the surface of the sauce. Have someone hold the bag directly over a large bowl while you use kitchen shears to snip one of the very bottom corners of the bag.
The sauce will immediately escape into the bowl, so pinch off the bag at the hole just before the fat reaches the bottom to prevent it from joining the sauce. Discard the bag and the fats.
Brisket will keep in an airtight container in the fridge for up to 3 days, or in the freezer for up to 6 months. Reheat slices of brisket for 10-15 seconds in the microwave or in a skillet over low heat with some of the sauce.
Plan for 1/2 pound to 3/4 pound of raw brisket per person, depending on the eater, their appetite, and the time of day you’re serving the brisket – people typically eat more at dinnertime than at lunch. I usually plan for 3/4 pound per person so that I have some leftovers. 
Plan for 1 hour per pound of brisket as a good rule of thumb. As an example, a 10-pound brisket will take about 10 hours to become fully tender and rest before slicing and serving. Good brisket cannot be rushed, so allow yourself plenty of time.
Brisket is done when a meat thermometer inserted into the center of the brisket registers 195-205 degrees F. A fork should slide easily into the meat at this point. Keep in mind that as the brisket rests, it will also get more tender because the protein fibers relax.
When cooking brisket in the electric roaster, keep it submerged (fat side up) in the cooking liquids. Cook low and slow, and always keep the electric roaster covered.
Because electric roaster cooking is considered a moist-heat cooking method, bark will never develop on the exterior of the brisket as it does when smoking (a dry-heat cooking method). You can, however, remove the fully cooked (whole) brisket from the electric roaster and place it under the oven broiler to crisp up the exterior if desired.
Once a fully cooked brisket has cooled, chill it in the refrigerator before slicing. Slicing a chilled brisket makes this an easy task!
Absolutely, and it reheats just perfectly. You can reheat it in the defatted sauce in the electric roaster on low (300 degrees F or less is good) or in the oven or even in the microwave.
More Electric Roaster Oven Recipes
I have used my electric roaster oven to make so many of my favorite recipes. Recipes like Corned Beef and Cabbage in a Roaster are so much fun to make for St. Patrick’s Day gatherings. Or my Whole Turkey in a Roaster is also absolutely delicious for Thanksgiving dinner. Or try a Pork Butt in the Electric Roaster oven, too!
If you try this recipe, please rate the recipe and leave a comment below! It helps others when they can read your personal feedback. And, if you snap any photos, please share them on Instagram so we can repost them to our Stories!
Brisket in the Electric Roaster
Save this Recipe
Ingredients
- 8-10 pound beef brisket flat Trimmed of excess fat by the butcher
- 1 tablespoon kosher salt May substitute 1 teaspoon table salt, if preferred, but I really recommend using kosher salt
- 2 teaspoons black pepper
- 3 cups beef broth I make my using Better Than Bouillon Beef Base Paste
- 12 ounce bottle tomato-based chili sauce, Such as Heinz, but use your favorite brand. May substitute 1 1/2 cups of ketchup combined with 1 tablespoon of cider vinegar.
- 1 ounce envelope Lipton Onion Soup Mix
- 1 cup packed brown sugar
Instructions
- Unwrap the brisket. Use your fingers to rub the salt and pepper all over the surface of the brisket on all sides. **Ideally, this step can be done up to 24 hours ahead of time to allow the brisket to season, but this requires planning ahead!8-10 pound beef brisket flat, 1 tablespoon kosher salt , 2 teaspoons black pepper
- Allow the seasoned brisket to rest, uncovered, at room temperature for 1 hour to allow the meat fibers to relax before cooking.
- Preheat a lightly greased electric roaster to 300 degrees F. Place the seasoned brisket into the prepared roaster, fat side up and meaty-side down. **I used an 18-quart electric roaster for this recipe. If you are using a larger electric roaster, you could likely fit and cook 2 brisket flats (8-10 pounds each) at the same time for a larger crowd.
- In a medium mixing bowl, prepare the sauce by whisking together the beef broth, chili sauce, onion soup mix, and brown sugar together.3 cups beef broth , 12 ounce bottle tomato-based chili sauce, , 1 cup packed brown sugar, 1 ounce envelope Lipton Onion Soup Mix
- Gently pour the prepared sauce mixture all around and over the beef brisket in the electric roaster.
- Bake, covered, for 8-10 hours or until the internal temperature of the meat is 200-208 degrees F. at the center when tested with an instant-read meat thermometer probe, and the meat is fork-tender.
- Turn off the electric roaster. Use two large meat/grilling spatulas to carefully lift and remove the brisket to a large cutting board. Tent the brisket with foil and allow it to rest and relax for 30 minutes while you finish the sauce.
- Allow the sauce to cool slightly, then pour it from the roaster into the strainer of a 6-cup fat separator pitcher. Wait a few minutes to allow the fats to separate and rise to the top – you will see a visible line were the fat ends and the sauce beneath begins.
- Once the fat layer is clearly on top, press the bottom release button of the fat separator so the sauce can escape into a bowl or saucepan. When most of the sauce is removed from the fat separator, quickly push the release button again to close it, leaving the fats to remain in the pitcher to be discarded.
- Untent the brisket, carving it across against the grain into 1/2-inch thick slices, or whatever thickness you prefer.**To carve across the grain of the meat, locate the parallel meat fibers that run the length of the brisket. Use a sharp carving knife to slice across them, preferably on the diagnonal, shortening the meat fibers as you slice for maximum tenderness.
- Return the brisket slices to the electric roaster set to the lowest temperature setting. Shingle the slices on top of each other across the bottom, then drizzle with some of the sauce as desired, or serve the sauce on the side. Cover the electric roaster to keep the brisket warm until ready to serve.
Notes
- I do not use the rack in the electric roaster when cooking brisket. I like the brisket to be fully down in the sauce while it is simmering so the meat can absorb all the flavors of the sauce as it cooks.
- If you have a dry rub or seasoning blend that you are especially partial to, you can absolutely substitute it in place of the salt and pepper in this recipe.
- Cooking the brisket in the electric roaster with the fat-side-up allows the fat to render down (into the meat) as it slowly simmers.
- If you want to make a bed of sliced onions over the bottom of the electric roaster before adding the seasoned brisket and sauce, you sure can and this will add an extra layer of flavor. However, keep in mind that you will have to strain these onions from the sauce before defatting it in the fat separator.
Nutrition
Nutritional Disclaimer
Chef Alli is not a dietitian or nutritionist, and any nutritional information shared is an estimate.