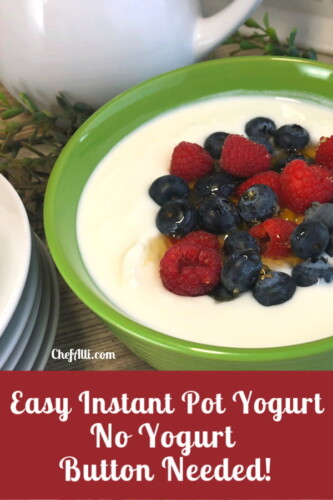
Easy Instant Pot Yogurt With No Yogurt Button
This creamy yogurt is made with plain whole milk, no pressure, and a starter yogurt for the most delicious Instant Pot Yogurt With No Yogurt Button.

No Yogurt Button with Instant Pot Yogurt
So you want to make homemade yogurt in your Instant Pot, eh? But maybe you have an Instant Pot that doesn’t have the yogurt setting?
OR, maybe your Instant Pot does have the yogurt button, but it seems too complicated to figure out the whole yogurt-making process that way.
That’s exactly how I felt, and then I realized that (DAH) we can do it THE EASY WAY using our Instant Pot!
We don’t NEED the yogurt button at all! And once you learn how to do this, I promise you’ll never buy yogurt again.
This plain whole milk yogurt recipe makes the most creamy yogurt you’ll ever put in your mouth.
Just an FYI right up front on this – you will not use pressure when making Instant Pot yogurt!
Instead, you use the saute setting to bring the milk to a boil, then proceed as directed below.

Ingredients for Instant Pot Yogurt with No Yogurt Setting Recipe
- Whole or 2% Milk: I enjoy a creamier, richer yogurt so I tend to use whole milk when making it. I’ve made yogurt with 2% milk, though, and it’s very good.
- Starter yogurt: This is just a container of regular yogurt bought in your grocery store. Use one container each time you want to turn a batch of milk into yogurt. You’ve got to have live, active cultures. Once you’ve started making yogurt at home, you can save some back each time, and that’s what you’ll use to make your next batch of yogurt.

How to make yogurt in Instant Pot
Place the milk into the inner pot of the Instant Pot.
Turn on the sauté setting.
Bring the milk to a boil.
Stirring it often, until the milk reaches 180 degrees F. when tested with an instant-read thermometer.
It will take 20-25 minutes for the milk to reach 180-200 degrees F. when using the sauté setting on the Instant Pot.
This can vary from Instant Pot to Instant Pot, depending on which model it is, etc.


Remove the inner pot of the Instant Pot to a hot pad or cooling rack, stirring the milk often to help it cool down.
Cool the milk to 110-115 degrees F. This will take about 30 minutes.
If you want to speed up the process of cooling the milk, you can place the Instant Pot into a big bowl of ice water.
This cooling process will take about 15 minutes, surprisingly fast if you ask me.


Once the milk has cooled down to 110-115 degrees F, stir in the active yogurt cultures, aka the “starter yogurt.”
Yes, you are reading that correctly….we need some yogurt to MAKE yogurt!
Place the starter yogurt into a small mixing bowl.
Add about 1/2 cup of the warm milk to the starter yogurt, whisking them together until smooth and incorporated.
Now pour the start yogurt mixture back into the pot of warm milk; whisk gently to combine.


Cover the Instant Pot with the lid, locking it into place; set the valve to the sealing position.
Set it in a cozy place on your kitchen counter to incubate for 8-10 hours.
Once you’ve reached the 8-10 hour mark, it’s time to check the yogurt.
Remove the Instant Pot lid.
The yogurt should look pretty solid but will still be a big jiggly at the center if you move the Instant Pot around.
There may be bubbles on top of the yogurt and this is fine.


Remove the inner pot of yogurt from the Instant Pot.
Carefully transfer the yogurt to a very large bowl that has a sealable lid.
Place the yogurt into the fridge and chill for 6-8 hours.
You can check the yogurt and determine if you want to strain the whey from the yogurt. This will thicken it further and make Greek yogurt.
I was surprised by how thick and creamy the yogurt became once it was thoroughly chilled.
Honestly, I rarely strain it.

What to eat with Instant Pot Yogurt with no Button
I have a favorite granola that I like to make to have on hand.
It’s a great combination – the ultra-creamy yogurt with crunchy granola.
Sometimes I serve yogurt in the morning topped with fresh fruit or even some warm strawberry jam.…also made right in the Instant Pot.
If you’re a warm steel cut oats fan, use yogurt as a topping.
How to Sweeten Yogurt
You can sweeten the whole batch if you’d like, but I always opt to leave it unsweetened.
This is because I often use plain yogurt for various recipes.
Instead, we sweeten our yogurt as we serve it, each to our liking.
You can use honey, maple syrup, agave nectar, monk’s fruit, or even plain ole granulated sugar.
I sweeten my bowl of yogurt with Splenda and it’s delicious.
Adding flavorings to yogurt
Surely, and I hope you will. You can add all kinds of flavorings to the yogurt, by using extracts or oils.
Banana Cream, lemon, strawberry cheesecake extracts for flavoring yogurt are delicious and the sky is the limit.
Runny Yogurt after incubating
This is because it hasn’t been chilled yet.
Once the yogurt chills in refrigeration, you find that it thickens beautifully!
You need yogurt to MAKE yogurt
Yes, that’s correct. Anytime you are trying to turn a batch of milk into homemade yogurt, you’ll need some live, active yogurt cultures for the process to happen.
The very first time you make yogurt at home, grab a plain Greek yogurt made from MILK (not nut milk yogurt or soy milk yogurt or the like) at the store ahead of time to begin this yogurt-making process.
Check the label to see that it states that it contains live, active cultures as part of the ingredient list.
This is the starter yogurt you will use to make your first homemade batch of yogurt.
If you have a friend who already has a batch of homemade yogurt on hand, hopefully, she will share some yogurt with you to act as your starter.
Starter yogurt for the next batch
I often worry that I’ll forget to hold yogurt back for my next batch.
To make sure I don’t forget, I take a few ice cube trays and fill them with yogurt, then pop them into the freezer.
Once the yogurt is frozen, I place the cubes into a freezer bag and store the bag in a handy place in my freezer.
Most ice cube tray compartments hold about 2 Tbs. within each cube.
The next time I make a batch of yogurt, I just add a couple of frozen yogurt cubes as my yogurt starter, stirring them into the warm milk until they are fully melted.
Cooking Yogurt on the Stove-top
Just follow the same 5 steps (listed above), immediately placing a lid on the pot to cover it.
Save this Recipe
Because an Instant Pot is very well insulated, you may want to wrap the stove top pot with a big, thick bath towel and place it in a draft-free area.
Or, place the pot into your oven with the oven light on for just a tiny bit of heat for the incubation process.
Other ways to incubate yogurt
Some people like to incubate in a slow cooker.
You can always wrap your pot or slow cooker in a big towel if you feel like it.
I’ve found that it’s not necessary as long as the vessel you’re incubating in is fully covered and in a non-drafty area.
Using a cooler is also handy.
Some cooks like to place warm yogurt into warm glass jars, wrapping them in towels, then into the cooler, closing the lid to let the yogurt incubate for 8-10 hours.
You can also just place the whole pot of yogurt (still covered) into the cooler and close the lid to allow it to incubate.
Why Drain Whey after incubating
Whey is a by-product liquid that is strained from milk once it is curdled, such as during the process of making dairy products like cottage cheese or yogurt.
Whey can be used for many things.
Add it to protein shakes. Use it for cooking if you like a tangy flavor in your pancakes and biscuits.
Feed it to your tomato plants in the garden – they like the added calcium.
Or do like we do and pour it over dogfood for you babies – they go nuts!
Whey is also great for brining chicken and pork so they are super moist and juicy.
Whey is actually quite good for us and there are lots of health benefits.
Just to name a few of them, whey is a good source of protein, can help with inflammation, promotes muscle growth, and can also help lower blood pressure.
How to store whey
We store our whey in a glass jar with a tight fitting lid in the fridge.
The biggest problem with keeping whey in the fridge is that it looks JUST LIKE lemonade.
If somebody takes a big swig of whey thinking it’s nice sweet lemonade, it will come spewing right out of their mouth.
Whey does NOT taste like lemonade in any way, shape, or form!
Making Yogurt in the Microwave
I don’t recommend making yogurt in the microwave.
It’s very dangerous to heat milk to 180 degrees in a bowl in the microwave.
Too many things can go wrong very quickly.
Hot milk can easily spill out of the bowl as you transfer it, making it a great way to get burned.
Heating milk up to 180 degrees F. in my electric pressure cooker
Depending on the brand of electric pressure cooker you own (Cuisinart, Instant Pot, etc), some brands simply don’t heat up as fast as others.
This doesn’t mean that they don’t work. It’s just a slower process.
I have found that both the Cuisinart electric pressure cooker and the Instant Pot electric pressure cooker can heat a half gallon of ice cold milk to 180 degrees F. in 15-20 minutes using the sauté setting.
How do I temp yogurt using an instant-read thermometer?
Insert the stem of the instant-read thermometer into the center of the hot milk, taking care not to touch the bottom or the sides of the pot since this can give you a false read.
Hold the stem submerged in the hot milk until the rising temperature on the gauge comes to a stop; this will take just a few seconds. When the temperature comes to a stop, this is the final internal temperature of the milk.
Can I use chocolate milk to make chocolate yogurt? 🙂
You sure can, and we do it all the time!
We like to use chocolate or strawberry milk for making yogurt – super delish, and my boys go crazy for it.
We also use root beer or orange crush milk to make yogurt.
When is the best time of day to make yogurt?
I like to make my yogurt in the late evening.
This way, your yogurt can undergo the 8-10 hour incubation process (when the milk transforms into yogurt) while you sleep.
In the morning, you can either strain it if you have time then or pop the yogurt into the fridge and strain it later.
What is Greek yogurt?
Greek yogurt is super thick yogurt because it has had most of the liquid (the whey) strained out of it.
I like to think of it as a “concentrated” form of yogurt.
Since I don’t strain the whey out of this recipe, I would not consider this Greek yogurt.
If you do strain the whey out of this yogurt batch, you would absolutely make Greek yogurt.
To make Greek yogurt, once the yogurt is chilled, you can strain it to make Greek yogurt, if preferred.
It may take a couple of batches of yogurt for you to figure out just how much whey you want to strain off – it’s all part of the process of making homemade yogurt.
Is Greek yogurt better for you than regular yogurt?
This is an ongoing debate and they both offer nutritional value, for sure.
A 6 oz. serving of regular nonfat plain yogurt provides 100 calories and 10 grams of protein.
Because Greek yogurt goes through a straining process that removes the whey (the liquid in the yogurt), this makes the yogurt much thicker and therefore higher in protein per serving.
A 6 oz. serving of nonfat plain yogurt provides 100 calories and 18 grams of protein, nearly double that of regular nonfat plain yogurt, making it much more nutrient dense.
And, even better Greek yogurt contains half the carbohydrates that regular yogurt does.
Strain yogurt to thicken to make Greek yogurt
I have found that the easiest way to strain yogurt is to place it into what’s called a nut milk bag.
These bags are also known as food strainer bags.
I’ve found them to be much easier to use for straining yogurt than coffee filter or cheesecloth.
Spoon the yogurt into the nut milk bag, then tie it to one of your cupboard handles.
Immediately place a large bowl beneath the bag of yogurt so the whey can slowly drip down into the bowl.
You’ll have a super thick batch of yogurt remaining in the nut milk bag.
If you feel that the yogurt is too thick (or maybe even dry), remember that you can always stir some of the strained whey back into the yogurt to achieve the texture you prefer.
What Tools Will I Need for Making Yogurt?
- Instant Pot – you can use any size depending on how big the batch of yogurt is that you want to make. I use the 6-quart Instant Pot for heating 1 gallon of milk to make yogurt.
- A basic instant-read thermometer – I keep a second one as a back up for peace of mind when I’m questioning whether a milk temperature is correct or not.
- Large (12 cup flat bottom) coffee filters with a large mesh strainer OR a nut milk bag and kitchen string with a large, deep mixing bowl for straining the whey from the yogurt.
- A balloon whisk for stirring the yogurt in case there’s a few lumps that need smoothed out.
- Glass bowls or large glass jars with tight fitting lids for storing the yogurt.
More Favorite Recipes to Enjoy
While we are on the subject, what are some other delicious dishes that we can easily make under pressure? If moist and dense cakes are your game, you will definitely enjoy Instant Pot Apple Cake with Rum Sauce or Pumpkin Cake with Chocolate Chips and Cider Glaze, my personal fav.
And if you’ve never experienced cheesecake made in the Instant Pot, just wait! We make this Instant Pot Key Lime Cheesecake a lot.

Instant Pot Yogurt With No Yogurt Button
Save this Recipe
Ingredients
- 1 gallon whole milk or 2% milk
- 1/4 cup live active milk cultures, which is contained in most yogurt made with milk, check the label to be sure
Instructions
Bring the milk up to temperature
- Pour the milk into the inner pot of the Instant Pot.
- Turn on the sauté setting. Bring the milk to almost boiling, stirring it often, until the milk reaches 180 degrees F. when tested with an instant-read thermometer.
- It will take 20-25 minutes for the milk to reach 180 degrees F. when using the sauté setting on the Instant Pot – I timed it! (This can vary from Instant Pot to Instant Pot, depending on which model it is, etc.)
Cool the milk back down
- Remove the inner pot of the Instant Pot to a hot pad or cooling rack, stirring the milk often since this will help it cool down. Cool the milk to 110-115 degrees F. This will take about 30 minutes.
- Use an instant-read thermometer to check the milk during the cooling-down process. This will take 15-20 minutes. Don't let the milk cool down below 110 degrees F!
- If you want to speed up the process of cooling the milk, you can place the Instant Pot into a big bowl of ice water (aka ice bath). This cooling process will take about 15 minutes, surprisingly fast, if you ask me.
Inoculate the warm milk by adding the live yogurt cultures
- Once the milk has cooled down to 110-115 degrees F, it’s time to inoculate the milk by stirring in the active yogurt cultures, aka the “starter yogurt.”
- Place the starter yogurt into a small mixing bowl; add about 1/2 cup of the warm milk to the starter yogurt, whisking them together until smooth and incorporated.
- Now pour the start yogurt mixture back into the pot of warm milk; whisk gently to combine.
Incubate the yogurt
- Cover the Instant Pot with the lid, locking it into place. Set the Instant Pot in a cozy, draft-free spot on your kitchen counter to incubate for 8-10 hours.
- Once you’ve reached the 8-10 hour mark, it’s time to check the yogurt. When you remove the Instant Pot lid, the yogurt should look pretty solid but will still be a big jiggly at the center if you move the Instant Pot around; there may be bubbles on top of the yogurt and this is fine.
Chill the yogurt
- Carefully transfer the yogurt to a very large bowl that has an sealable lid. Place the yogurt into the fridge and chill for 6-8 hours.
- At this point, you can check the thickness of the yogurt and determine if you want to strain the whey from the yogurt to thicken it further. Once the yogurt is fully chilled, it is thick and creamy but you may want to strain it to make Greek yogurt.
Nutrition
Nutritional Disclaimer
Chef Alli is not a dietitian or nutritionist, and any nutritional information shared is an estimate.


Can I make a 1/2 gallon batch? Other than using 1/2 as much yogurt starter, would anything else change? Thanks!
Hi Anita!
I’ve never made a half batch so I cannot advise that I’d definitely works, but I can’t see any reason that it wouldn’t, truly. Apart from using half as much starter yogurt (and I might not even do that!), every step would remain the same. If you try this, I’d appreciate your feedback for future reference in this recipe.
Thank you,
Chef Alli
I haven’t made this yet, but I have a few questions.
Can you use the yogurt made this way for the starter in the next batch?
And how would you go about flavoring a whole batch? Say like a pumpkin spiced flavored yogurt?
Hi Debbie –
Yes, you can absolutely use the yogurt you make using this recipe for the starter yogurt needed for your next batch – it works great and I do it all the time.
As for the flavoring, I’m sorry I cannot answer that as we use it as is (plain) and I’ve never explored flavoring options! I’m so sorry I’m not help in the regard.
Sincerely,
Chef Alli
I’ve been told to add dry milk to the yogurt to thicken it, rather than removing the whey. What are your thoughts on this? I wanted to check prior to making this.
Thank you for your help,
Hi Cindy –
I have not tried this and so far haven’t even done the research on that since I’ve not heard of doing so. If you give it a try, I’d love your feedback and the experience you get!
Chef Alli
On the first step, bring to boil, should the lid be used?
Hi Kristie –
Setting the lid on top of the Instant Pot will help to contain the heat so the milk can come up to temperature (to boil) more quickly. But you aren’t using the Instant Pot to pressurize anything so there’s no need to lock it into place. I don’t use the lid myself because I like to keep a close eye on the milk as I bring it to a boil, stirring it often. Hope this makes sense! Let me know if you have more questions!
Chef Alli
I have to say I was intimidated to try making yogurt but this recipe laid everything out and it was so easy!! I am wondering though how long you recommend straining the yogurt?
That is hard to say because it completely depends on how thick you want the consistency to be. If you strain off too much and find the yogurt is too dry/thick for your taste, you can stir some of the whey right back in. I strain my for just about 30 minutes is all because my family likes it to be a consistency that’s kind in between regular yogurt and Greek yogurt.
Hope this helps!
Chef Alli
How long will the finished product last in the refrigerator? Do you can it or just cover it with a lid?
Hi Janilyn –
I place the yogurt into an air-tight container in the fridge. It will keep for 5-7 days…but I bet your peeps won’t allow it to last that long. My family loves this homemade yogurt!
Sincerely,
Chef Alli
Woke up to milk consistency yogurt. It’s warm in Australia now and my kitchen is upstairs so it’s warm overnight so I didn’t wrap my instant pot. I used 1 litre of full fat milk and 1 tbsp of Greek yogurt. Anyway I poured it in a jar and sealed it. I doubt it will thicken. Followed all the recipe.
Hi Andrea –
I’m so sorry this happened, but let me say that sometimes when it comes to making yogurt, it just DOES. I’ve had this exact thing happen to me and I’ve never been able to pinpoint why it sometimes happens. Please don’t let it discourage you and do try again! I promise this recipe DOES WORK and I use it all the time. Give it one more shot and please let me know how it goes – I definitely want you to be successful with this yogurt because it’s DELICIOUS and such a money saver!
Sincerely,
Chef Alli
LOVE THIS, I will never go back to any other way of yogurt again. So easy, who knew?! Thank you!!
Hi Brittney –
Thank you so much for letting us know that this recipe worked well for you – doesn’t it make just THE BEST yogurt and also so economically? So glad you’re enjoying it! Thank you for the 5-star rating, too.
Sincerely,
Chef Alli
It was so easy! I had no idea making yogurt was so simple!! I used 2% milk and left it for 14 hours. It was absolutely delicious! I only had a candy thermometer which worked just fine. I will be making lots more! Thank you for easy to follow instructions and so many helpful hints. This newbie to yogurt making appreciated it!
Hi Deb –
I felt the same exact way when I first tried it! Who knew??? There’s no going back now, let me just say. So glad this was successful for you, as well – we just love it. Delicious AND way cheaper!
Your fan,
Chef Alli
THE BEST DIRECTIONS EVER!!!! THANKS
Hi Stuart –
Thank you! Glad you found it helpful. Thanks for letting me know and for the 5 Star rating – so appreciated!
Chef Alli
Can I leave my pot on the “warm” setting for 8 hours instead of the towel and all that?
Hi Lexi-
Actually, you cannot use the warm setting for that part as it will keep your yogurt too warm at that point. This is because the warm setting on an Instant Pot (or any brand of electric pressure cooker) has to keep the food inside at a safe, hot temperature which is about 145-170 degrees F. which is too warm for incubating yogurt. If you don’t want to do the towel part, I’m told that you can cover the inner pot and then set it down into a small cooler and close the lid to let the yogurt incubate. I have not tried this, but I do believe it will work just fine (as long as it’s a small cooler) since I use a cooler quite often to let grilled meats finish cooking inside. A cooler can really hold in the heat! Please let me know if you have further questions!
Chef Alli
I made this last night, and it turned out perfectly! We liked the consistency without straining, so it was ready to eat right away. It was delicious with a bit of vanilla-infused stevia drops and granola on top. Thank you for your clear instructions and extra information!
Hi Sarah –
I’m glad to learn this recipe was successful for you. Thanks for taking time to let me know. There’s only one bad thing about homemade instant pot yogurt…once you have it, it’s super difficult to go back to store-purchased yogurt!
Sincerely,
Chef Alli
My husband say the yogurt is fantastic. (I don’t like yogurt.) He ate it every day gor breakfast doctoring it up in different ways. His favorite was putting honey & vanilla in it.
It is amazing that just putting in a quarter cup of yogurt cubes in a gallon of milk will make yogurt. Science experiment!
The first time we made it, I used coffee filters. They kind of fell apart getting the yogurt off them. This time I have a nut milk bag. It is fun watching the whey drip out.
Our daughter lives in Peru. They eat a more liquidy form of yogurt like when you first open the instant pot. So my husband says why do we have to strain it.
Question: The yogurt has been in the bag for about half an hour & isn’t straining like before. Should I stir it once in a while?
Hi Andrea –
Love your comments here regarding the yogurt – I’m so glad your husband is enjoying the homemade stuff. It’s the best! I agree about the coffee filters – they aren’t the best, but will definitely work in a pinch for straining. Nut milk bags are the way to go, for certain. You don’t have to strain the yogurt at all – it just depends on the consistency that you prefer. Straining the whey just makes for a thicker consistency like Greek yogurt is. As for why your yogurt isn’t straining like before, I’m not quite sure! You can definitely give it a stir or even just put pressure on the bag with your hands if you want to squeeze a bit more moisture out of it. And, remember that if you squeeze too much whey out of the yogurt and it’s now too dry and thick, you can always stir some of the whey back in. Hope this helps!
Sincerely,
Chef Alli
I am in the process of making the yogurt right now. I just put it to bed for the night. My times were somewhat different from yours. It took 30 minutes to get to 180 degrees. Then it took about an hour to get down to 118 degrees. Why the discrepancy in times?
Hi Andrea –
There can be lots of reasons for the discrepancy in times. I’m guessing our ingredients may have been at different temperatures when we started the process (but who knows, right??) and that our Instant Pots just each work a bit differently, making it take longer for some weird reason. Also, as weird as it sounds, the temperature outdoors can make a difference as to how long it takes things to heat up, cook, cool down, etc.
I’m just hoping your yogurt turned out and great and that you’ll let me know the end result!
Let’s Keep Cookin’,
Chef Alli
Chef Alli, I have heard people adding sweetened condensed milk to their yogurt. Any thoughts on this and when you would add it?
Thanks