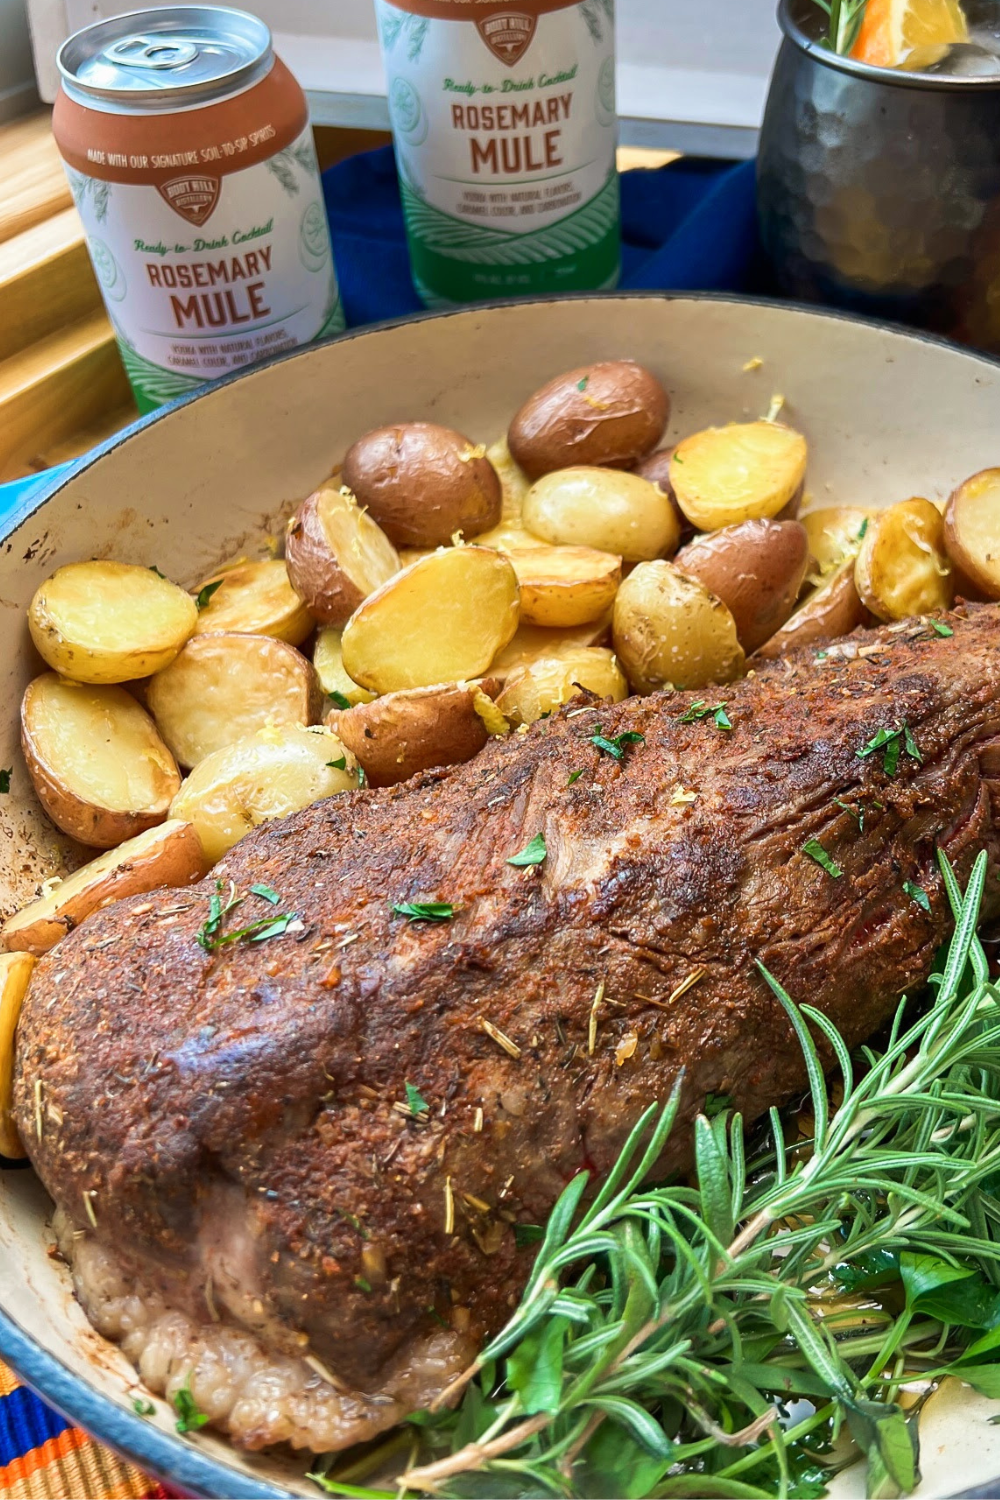
Beef Tri Tip Roast With Crispy Potatoes
Buttery potatoes and a perfectly seared, juicy tri tip roast, mixed with your favorite steak seasoning make this Beef Tri Tip Roast with Crispy Potatoes one of our favorite oven baked beef tri tip recipes.
Love tri tip as much as I do? Try tri tip in the electric roaster oven or tri tip on the smoker.

Beef Tri Tip Roast With Crispy Potatoes Recipe
This beef tri tip roast recipe one of our favorite tailgate recipes that you can start in your kitchen and finish in the oven or on the grill.
Both the tri tip beef and the crispy potatoes are fantastically delicious right from the oven, as well as later when reheated (or even at room temperature) upon arrival to your tailgate party.
If you’re making this beef dish for a tailgate or watch party, do make sure you cook it up in a cast iron skillet, if possible.
If you plan to reheat the tri tip at a tailgate party later on, it’s especially important to undercook it a bit, so look for tips on handling that in the recipe below, if that’s the case.
It goes great with a Boot Hill Distillery Rosemary Mule Cocktail.
What you’ll learn from this recipe
- Why BEAUTY REST is the absolute #1 most important technique to apply anytime you are cooking meat of any kind.
- How to sear off meat for a perfectly golden brown and caramelized exterior every time.
- Why an instant-read meat thermometer is so important for perfect doneness.
- How to check the internal temperature of the roast using a meat thermometer.
- How to roast potatoes – quick and dirty! (it’s all about the baking sheet)

Ingredients you need to make this recipe
- Beef tri tip toast, we love to get our tri tip roasts from Pacheco Beef (they ship direct to your door!)
- Olive oil, for rubbing the beef and roasting the potatoes
- Your favorite steak seasoning
- Small red and gold potatoes
How to make Tri-Tip Roast and Potatoes
Remove the tri tip roast from refrigeration and unpackage it.
Rub the tri-tip roast with olive oil, then sprinkle the beef with the steak seasoning, applying it fairly liberally all over the roast, depending on how salty your steak seasoning is.
This step can be done ahead of time, if preferred.
Let the seasoned tri tip rest, uncovered, on the counter for an hour to remove a lot of the chill from refrigeration.
Do not skip this step, whatever you do! Resting the roast before cooking allows the protein fibers to relax so the meat can cook more evenly.
This resting period is essential for a great beef eating experience.
Preheat the oven to 400 degrees F.
While you are prepping the potatoes for the oven, place a large rimmed baking sheet on the center rack of the oven to preheat.
This will help your potatoes to get more golden brown and crispy, plus they cook more quickly, too.
While the roast is resting, prepare the potato halves by placing them into a large bowl.
Add a good drizzle of olive oil and season to taste with salt and pepper, tossing to coat the potatoes well.
Remove the hot baking sheet from the oven and carefully spread the potatoes out in a single layer.
If the baking sheet is really nicely preheated, there will be some sizzle involved at this point.
Sizzle is actually a good thing at this point, but do take care in case there’s some splattering involved, too.
Roast the potatoes, uncovered, for 10 minutes, then gently toss. Continue to roast the potatoes for an additional 10 minutes or so, just until they are fork-tender.
Reserve the potatoes while the tri tip has a turn roasting in the oven.
Use a fork to test the potatoes, not a knife. You want them to be fork-tender, not knife tender!
Increase the oven temperature to 425 degrees F. Place a large cast iron skillet (I use my 12-inch) over medium high heat.
When the skillet is nicely preheated, add a good swish of olive oil.
Using your best long-handled tongs or meat fork, lift the roast over to your skillet, placing the meat top-side down and fat-side up into the hot oil.
You should hear some great sizzle at this point, the indicator that your roast will be caramelized soon.
Let the roast sit (meaning don’t fiddle with it or move it at this point) so it can sear off and get some good browning going.
After 4-5 minutes, lift the roast a bit to check the bottom.
If it’s beautifully browned and caramelized at this point, turn it over in the skillet to brown the opposite side, adding a bit more olive oil to the bottom of the pan, if needed.
I usually brown all sides of my tri tip roast, including the ends, by holding it against the bottom of the skillet with my tongs, as needed.
This just takes a few additional minutes.
Keep in mind that you are just browning the roast at this point, not fully cooking it. That part comes in the next step when the roast goes into the oven.
Once the roast is browned, it’s time to head to the preheated 425 degree F. oven.
Roast the meat, leaving it right in the cast iron skillet, for 10-12 minutes per pound, uncovered and on the center oven rack.
Check the internal temperature of the roast at about the 20 minute mark for a medium-sized (approx. 2 1/2 lbs. or so) tri tip roast.
This is important so that you do not overcook the roast.
Continue to roast the beef until the internal temperature in the thickest part of the meat reaches 125-130°F for medium-rare doneness or 130-135° for medium doneness when tested with an instant-read meat thermometer.
Keep in mind that after removing the roast from the oven, it is definitely going to raise in internal temperature an additional 10 more degrees as it rests while covered with foil.
If you are planning to take the tri tip to a gathering where you’ll be reheating later on, you may even want to cook the tri tip to an internal temperature that is more rare (less done) than you would normally eat it.
This way, when you reheat the beef later it doesn’t become overcooked.
When the roast reaches your desired internal temperature, remove it from the oven.
Save this Recipe
Loosely cover the skillet with foil, allowing the roast to rest for 10 full minutes.
This resting period is when the protein fibers of the meat can relax and the beef juices can redistribute themselves throughout the roast.
During this resting period is also when the roast continues to cook from residual heat, raising to the final internal temperature.
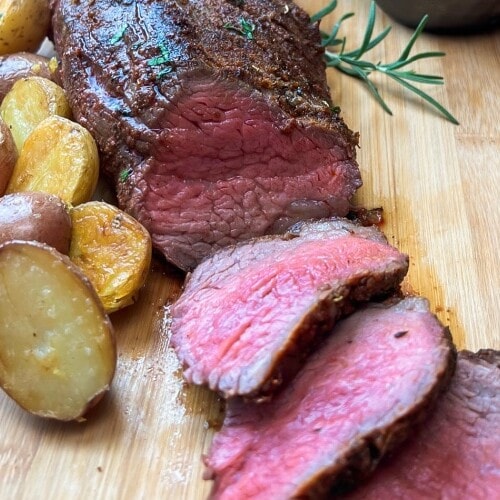
Now it’s time (finally!) to slice the tri tip.
Place the cooked roast onto a large cutting board. Because a tri tip roast has two grains that run in opposite directions, find the center point of the roast where the grains meat.
This is where you want to slide the tri tip in half.
Turn each half on the cutting board so that you can slice it across the grain (not with the grain, mind you) into slabs of steak that are about 1/2-inch thick.
Place the slices of tri tip back into the cast iron skillet, overlapping them one on top of the other on one side of the pan.
Place the reserved potatoes into the skillet on the other side, opposite the sliced beef.
Serve at once, or cover the skillet to transport later if you’re heading out to the tailgate party.
The sliced tri tip and the potatoes are both delicious served warm, or at room temperature.
What IS Tri Tip Roast
Tri tip is a triangular-shaped beef roast that comes from the lower part of the sirloin muscle on the cow.
And like I stated above, because it’s not super well-known here in these parts of NE Kansas (though that is finally changing!) it often gets ground into hamburger or cut into stew meat…..a tragedy, for sure.
But more importantly, tri tip is absolutely mouth-watering…..like a cross between a brisket and a steak….true story. Some have even claimed it be the “poor man’s prime rib” and I would totally agree.
Does searing meat really make a difference?
It sure does! For optimal flavor, I think searing the tri tip roast (or any roast or steak for that matter) is super essential.
Here’s why: when meat is seared on the exterior, you are caramelizing the natural sugars and browning the proteins. This forms a crusty exterior that is rich and flavorful – a total must for a fantastic eating experience.
Why does meat need beauty rest??
This is so so important! First, you need to give the meat rest BEFORE you cook it. This requires getting the meat out of refrigeration and onto the counter.
Unwrap the meat and let it rest where the chill from refrigeration can escape so the fibers of the meat can relax and the juices and fat that coagulate at the center can move to the outer edges.
Beauty rest BEFORE cooking/grilling/roasting makes a HUGE difference in how the meat cooks and receives heat – do not skip this step!!
AFTER meat cooks is also a very opportune time for beauty rest. Remove the meat from the cooking surface and immediately tent it with foil.
As the meat rests at this point, it will relax and continue to rise in temperature from residual heat.
Also, any juices that may have moved to the outer edges of the meat have an opportunity at this point to move back to the center – this ensure the meat is nice and juicy when you slice and enjoy it.
Does all meat need beauty rest?
Any type of whole muscle meat (like a roast or a steak, etc…but never ground meats) will benefit with before and after beauty rest.
I always rest my pork chops and pork tenderloins, venison backstrap, chuck roasts, steaks, whatever. If it’s whole muscle meat, REST, REST, REST. (Did I tell you that already? ha)
Is it important to use an instant-read thermometer when cooking meat? Why?
Great question, and yes! I always recommend that cooks use an instant-read thermometer when cooking meat! The worst thing you can do when cooking meat is to over cook it.
Once it’s overcooked, you have no recourse. You can always cook a piece of meat longer, but you can’t go back….aaarrrggghhh.
The best way to know the internal temperature of meat that is cooking is to use an instant-read meat thermometer, never by the ole cut-and-peek method (there went all your juices when you did that, btw) and I’m really not even a fan of the “touch” method for doneness either. Use an instant-read thermometer – it’s so easy and worth it.
What is the correct way to use an instant-read meat thermometer?
As the meat is approaching the mid-way point of cooking, I like to begin taking the internal temperature. Keep in mind that as meat gets closer to being done, it will gain speed in how quickly the temperature rises.
When you’re ready to temp the meat, insert the instant-read thermometer into the thickest area of the meat. Watch the dial, allowing it to raise and come to a halt at the final temperature – this will take a few seconds.
Once the dial stops raising in degrees, this is the final internal temperature of the meat; remove the thermometer and continue cooking, if needed.
Or, if the meat is 10 degrees below the final finished temperature that you desire, remove it from the cooking source and tent with foil so it can continue to finish cooking from residual heat.
Also keep in mind that the instant-read thermometer should never touch a bone or the bottom of the pan since this will give you a false-read of true internal temperature.
And if you are cooking something that is thinner (say a chicken breast or a hamburger patty) insert the instant-read thermometer from the side, not the top.
Which tools are helpful for cooking beef tri tip?
12-Inch Cast Iron Skillet – A traditional cast iron skillet or an enamel-lined cast iron skillet works very well for cooking meat because it can withstand the high temperatures needed to sear the tri tip roast, creating great exterior caramelization. Once the roast is nicely seared, you can place the cast iron skillet directly into the oven – it’s so versatile.
Chef’s knife – a good chef’s knife is such an essential kitchen tool! In this recipe, you’ll need one for slicing the eye of round roast into very thin slices, like deli roast beef. . **If taken care of properly, a good quality chef’s knife will last a lifetime, definitely make it worth the initial investment.
Large wooden cutting board with a channel – a good (large) wooden cutting board is what supports your chef’s knife, providing a surface that gives to the edge of your blade each time you make a cut. One side of the cutting board will feature the channel around the edge. This is the side that you should slice meats on – the meat juices funnel into the channel so they cannot run off the cutting board to create a mess on the counter. Use the other side of the cutting board for cutting and dicing fruits and vegetables.
Knife straightener – a hand-held knife straightener (often called a knife sharpener) is what keeps your chef’s knife blade straight so that it can make a precise, clean cut. Run your knife (never a serrated knife, though) through the straightener 2-3 times each and every time you prepare to use it to keep the blade in good shape.
Meat thermometer – I prefer an instant-read probe, but a traditional meat thermometer works fine, as well. It’s also handy to use a digital thermometer that has dual probes that can notify you when the meat raises to the temperature you’ve programmed for.
Long-handled tongs – a nice pair of long-handled stainless steel tongs is essential when searing off any type of meat. The longer length keeps you from getting burned from any fats that might splatter during the cooking process.
More Favorite Beef Recipes to Enjoy
- SMOKED WHISKEY BBQ MEATLOAF
- TWO-MINUTE GARLIC BUTTER SIZZLE STEAKS
- EASY GRILLED STEAK AVOCADO TOASTWITH BOOT HILL VODKA BASIL LEMONADE COCKTAILS
- COUNTRY-FRIED STEAK FINGERS WITH CREAM GRAVY
Beef Tri Tip Roast With Crispy Potatoes
Save this Recipe
Ingredients
- 2-3 pound tri tip roast, we love to get our tri tip roasts from Pacheco Beef in Alma, KS (they ship direct to your door!)
- Olive oil, for rubbing the tri tip and roasting the potatoes
- Your favorite steak seasoning, to taste
- 2 pounds Small red and gold potatoes, usually called B-size potatoes at the grocer
Instructions
- Remove the tri tip roast from refrigeration and unpackage it. Rub the tri-tip roast with olive oil, then sprinkle the beef with the steak seasoning, applying it fairly liberally all over the roast, depending on how salty your steak seasoning is. **This step can be done ahead of time, if preferred.2-3 pound tri tip roast, we love to get our tri tip roasts from Pacheco Beef in Alma, KS (they ship direct to your door!), Olive oil, for rubbing the tri tip and roasting the potatoes, Your favorite steak seasoning, to taste
- Let the seasoned tri tip rest, uncovered, on the counter for a couple of hours to remove a lot of the chill from refrigeration. **Do not skip this step, whatever you do! Resting the roast before cooking allows the protein fibers to relax so the meat can cook more evenly. This resting period is essential for a great beef eating experience.
Roast the Potatoes
- Preheat the oven to 400 degrees F. While you are prepping the potatoes for the oven, place a large rimmed baking sheet on the center rack of the oven to preheat. **This will help your potatoes to get more golden brown and crispy, plus they cook more quickly, too. While the roast is resting, prepare the potato halves by placing them into a large bowl; add a good drizzle of olive oil and season to taste with salt and pepper, tossing to coat the potatoes well.2 pounds Small red and gold potatoes, usually called B-size potatoes at the grocer
- Remove the hot baking sheet from the oven and carefully spread the potatoes out in a single layer; if the baking sheet is really nicely preheated, there will be some sizzle involved at this point. Sizzle is actually a good thing at this point, but do take care in case there's some splattering involved, too.
- Roast the potatoes, uncovered, for 10 minutes, then gently toss. Continue to roast the potatoes for an additional 10 minutes or so, just until they are fork-tender. Reserve the potatoes while the tri tip has a turn roasting in the oven. **Use a fork to test the potatoes, not a knife. You want them to be fork-tender, not knife tender!
Sear the Tri Tip Roast
- Increase the oven temperature to 425 degrees F. Place a large cast iron skillet (I use my 12-inch) over medium high heat. When the skillet is nicely preheated, add a good swish of olive oil. Using your best long-handled tongs or meat fork, lift the roast over to your skillet, taking care to place the meat top-side down and fat-side up into the hot oil. You should hear some great sizzle at this point, the indicator that your roast will be caramelized soon. Let the roast sit (meaning don't fiddle with it or move it at this point) so it can sear off and get some good browning going. After 4-5 minutes, lift the roast a bit to check the bottom; if it's beautifully browned and caramelized at this point, turn it over in the skillet to brown the opposite side, adding a bit more olive oil to the bottom of the pan, if needed. I usually brown all sides of my tri tip roast, including the ends, by holding it against the bottom of the skillet with my tongs, as needed. This just takes a few additional minutes. **Keep in mind that you are just browning the roast at this point, not fully cooking it. That part comes in the next step when the roast goes into the oven.
Roast the Tri Tip in the Oven
- Once the roast is browned, it's time to head to the preheated 425 degree F. oven.Roast the meat, leaving it right in the cast iron skillet, for 10-12 minutes per pound, uncovered and on the center oven rack, beginning to check the internal temperature of the roast at about the 20 minute mark for a medium-sized (approx. 2 1/2 lbs. or so) tri tip roast. **This is important so that you do not overcook the roast. Continue to roast the beef until the internal temperature in the thickest part of the meat reaches 125-130°F for medium-rare doneness or 130-135° for medium doneness when tested with an instant-read meat thermometer. **Keep in mind that after removing the roast from the oven, it is definitely going to raise in internal temperature an additional 10 more degrees as it rests while covered with foil. **If you are planning to take the tri tip to a gathering where you'll be reheating later on, you may even want to cook the tri tip to an internal temperature that is more rare (less done) than you would normally eat it. This way, when you reheat the beef later it doesn't become overcooked.
- When the roast reaches your desired internal temperature, remove it from the oven; loosely cover the skillet with foil, allowing the roast to rest for 10 full minutes. **This resting period is when the protein fibers of the meat can relax and the beef juices can redistribute themselves throughout the roast. During this resting period is also when the roast continues to cook from residual heat, raising to the final internal temperature.
Slice the Tri Tip
- Now it's time (finally!) to slice the tri tip. Place the cooked roast onto a large cutting board. Because a tri tip roast has two grains that run in opposite directions, find the center point of the roast where the grains meat; this is where you want to slide the tri tip in half. Turn each half on the cutting board so that you can slice it across the grain (not with the grain, mind you) into slabs of steak that are about 1/2-inch thick. Place the slices of tri tip back into the cast iron skillet, overlapping them one on top of the other on one side of the pan. Place the reserved potatoes into the skillet on the other side, opposite the sliced beef. Serve at once, or cover the skillet to transport later if you're heading out to the tailgate party. **The sliced tri tip and the potatoes are both delicious served warm, or at room temperature.
Nutrition
Nutritional Disclaimer
Chef Alli is not a dietitian or nutritionist, and any nutritional information shared is an estimate.
turned out great 🙂 my son keeps saying omg so good while he’s eating, he’s picky so this was a win. it took 30 minutes for the potatoes and 2lb tri tip was more like 35-40 minutes took it out at 135° and let it sit 10min but too bloody every time I sliced it so put it in for 10 more min… perfection thanks for the recipe
Hi Tasha – I’m glad this recipe worked well for you. We love tri tip!! I’m glad you took the tri tip out and check the temp when it was 135 degrees. You can always add more cooking time (just like you did) but once meat is over-cooked, there’s no going back. Great job!
Thank you for your comment here and the rating, too – I so appreciate it.
Sincerely,
Chef Alli