Cheeseburger Sliders with Hawaiian Rolls
Made with savory Hawaiian Rolls, ground beef, bacon, and cheddar cheese in the oven, these Cheeseburger Sliders with Hawaiian Rolls are perfect for tailgating or a party.

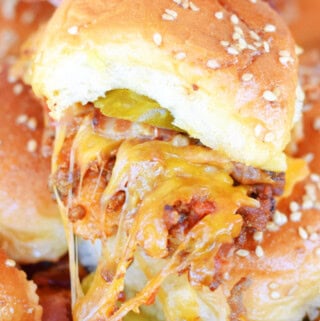
Cheeseburger Sliders on Hawaiian Rolls Recipe
These sliders are loaded with bacon cheeseburger flavors….right down to the pickles.
When that cheese melts, it wraps up all of the flavors of ground beef, spicy mustard, smoky bacon, and fresh dill pickles in one little bite that explodes in your mouth.
They are soooo good, budget-friendly and customizable!
If you are making this for a crowd, it’s super easy to double this recipe for these sliders and make four pans at once.

Ingredients
- Ground beef: I typically use 93% lean ground beef for this recipe but you can use what you have on hand or what’s on sale. Be sure to drain the fats after you cook the ground beef so the cheeseburger filling doesn’t have a greasy mouth-feel. I’ve often used ground venison in this recipe, too – it works perfectly.
- Bacon: As you cook the ground beef, you can cook the bacon separately. I like to cook mine in the air fryer. Once the bacon is browned and crisped, place it onto a paper towel-lined plate to drain before you chop it.
- Cheddar cheese: You can vary this recipe by changing up the type of shredded cheese you use. We like sharp cheddar but I’ve also used Monterey Jack and Cheddar Jack, too.
- Hawaiian buns or your favorite slider buns: If you don’t have slider buns, you can use hamburger buns.
- Diced onion: Substitute onion flakes or onion powder if you don’t want to dice a white or yellow onion.
- Diced tomatoes and green chilies: Drain these well to keep the cheeseburger filling nice and thick.
- Sliced hamburger pickles (sliced dill pickles): Sometimes these are called dill pickle chips on the jar, fyi.
- Sauces in the cheeseburger filling: Ketchup, Spicy brown mustard, Worcestershire – these really define the cheeseburger flavor profile.
- Butter topping: melted butter, spicy brown mustard, Worcestershire, brown sugar: Combine these ingredients and brush them over the top of the sliders after you’ve assembled everything – this offers the perfect finishing touch. Sprinkle with sesame seeds, if desired!

How to Make Bacon Cheeseburger Sliders
Make the ground beef cheeseburger mixture in a skillet, cooking until it’s fully done throughout.


Meanwhile, slice the slider buns in half, placing the bottom halves across the bottom of a greased 9 x 13 baking dish.
Spread the cooked cheeseburger mixture over the slider bottoms in the baking dish, then top with shredded cheese, chopped bacon and sliced pickles.


Lastly, add the top slider buns. Combine the glaze ingredients, then use a silicone pastry brush to brush the glaze over the top of the sliders in the baking dish, letting it run down the sides of the baking pan; sprinkle with sesame seeds, if using.

Bake the sliders, covered with foil, for 20-25 minutes, removing the foil during the last 10 minutes of the baking time. Sliders should be golden brown on top and hot throughout. Enjoy at once!

Can I make sliders ahead and freeze them
Yes, but make sure to bake the sliders from frozen.
Don’t thaw them first since this can cause the buns to become soggy.
Instead, place the foil pan of frozen sliders into a 300 degree F. oven, covered, and bake for 30 minutes.
Remove the foil covering and continue to bake an additional 15-20 minutes or until the sliders are hot throughout. (165 degrees F. at the center)
To make it even easier, use foil pans for the sliders you are freezing so your glass baking dishes aren’t all tied up in the freezer.
Can I use regular hamburger buns to make sliders?
You can definitely use just plain hamburger buns, they just won’t be the nice small cocktail size of slider buns.
This is a great question, and I have encountered the same thing. Sometimes you just have to use what you have on hand or what’s available at the grocery store.
Can I freeze slider buns?
Yes! That is exactly what I do when I find them on sale and freezing the buns works well.
Save this Recipe
They can stay in the freezer for up to 3 months.
Best way to thaw slider buns
I hang mine from a cupboard handle, or sometimes I place the end of the plastic bag beneath the edge of a plate in my cupboard, leaving the cupboard door open until the bag of bread or buns is thawed.
It works great!
I learned a great kitchen tip from my Grandma Lucille.
Never lay slider buns on the counter to thaw since this can cause any moisture from thawing to reach the area that’s flat against the counter.
This can cause sogginess and an area that’s no longer soft and tender, as we want bread and buns to be.
Instead, hand the package of buns or bread while thawing.
How do I know when the sliders are hot and safe to eat?
When you feel the sliders should be fully cooked (at the end of the baking time), use an instant-read thermometer to test them.
Insert the thermometer into the center of the pan of sliders (coming in at an angle more from the side than the top).
Watch the dial to see when the temperature stops (it only takes a few seconds).
This will be the internal temperature and must be at least 165 degrees.
This tells you the sliders are fully hot throughout and also safe to eat.
Can I use other ground meats to make sliders?
Since we nearly always have ground venison in our freezer, I like to make these sliders with half venison or pork and half ground beef.
You can also use any type of ground turkey, ground chicken, or even ground bison, too.
Other Recipes to Enjoy
When we need some sliders in a hurry, I regularly turn to Instant Pot Buffalo Chicken Sliders. These sliders are made with chicken breasts that I sometimes have to cook from frozen in my Instant Pot when dinner is an absolute emergency.
These Easy Barbecue Chicken Sliders are perfect for easy dinners or parties and only require chicken, bbq sauce, cheese, and Hawaiian rolls or slider buns.
And, because we do love those ground beef recipes, as I mentioned above, we have fallen in love with this easy slider recipe – Beef Patty Melt Sliders with Secret Sauce.
Feeling adventurous? Try these Corned Beef Sliders. They taste so much like little Reuben sandwiches!
Cheeseburger Sliders with Hawaiian Rolls
Save this Recipe
Ingredients
- 2 pkgs. Hawaiian sweet rolls, 12 oz. each
- 2 cups shredded cheddar cheese divided use
- 2 lbs. lean ground beef
- 1 medium yellow onion, diced may substitute 1 Tbs. dehydrated onion flakes
- 14 oz. can diced tomatoes and green chilies well drained
- 1 cup ketchup
- 2 Tbs. spicy brown mustard We love Holme's Made Smoked Cowboy Mustard
- 1 Tbs. Worcestershire sauce
- Sliced hamburger dill pickles
- 1 lb. center-cut smoked bacon cooked, drained, and chopped
Glaze
- 1/3 cup unsalted butter, melted
- 2 Tbs. packed dark brown sugar
- 1 Tbs. Worcestershire sauce
- 1-2 Tbs. spicy brown mustard depending on how tangy you prefer
- 1 Tbs. toasted sesame seeds, as garnish optional
Instructions
- Preheat oven to 350°
- Spray two 9-inch by 13-inch pans with non-stick spray. (Or you can use a single 10-inch x 14-inch pan for this recipe of 24 sliders but it's a tight fit!) Leaving the sheets of slider buns intact, cut each sheet horizontally in half, then arrange each sheet of bottom halves across the bottom of each 9 x 13 pan. (Reserve the top sheets of rolls for later in the recipe.)2 pkgs. Hawaiian sweet rolls, 12 oz. each
- Sprinkle 1 cup of the cheddar cheese over the bottom buns in the pan.2 cups shredded cheddar cheese
- Meanwhile, in a large skillet over medium heat, cook and crumble the ground beef with the diced onion (or onion flakes) until the beef is fully cooked throughout (no longer pink and 165 degrees F internal temperature). Remove the skillet from the heat and drain all fats from the beef mixture.2 lbs. lean ground beef, 1 medium yellow onion, diced
- Return the skillet to the burner over medium heat; stir in the drained diced tomatoes and green chilies, ketchup, mustard and Worcestershire sauce; stir until well combined and heated throughout, 2-3 minutes. Season with salt and pepper, to taste.14 oz. can diced tomatoes and green chilies , 1 cup ketchup, 2 Tbs. spicy brown mustard , 1 Tbs. Worcestershire sauce
- Spoon the prepared beef mixture evenly over the cheese and the rolls in each baking dish, then top with 1 cup shredded cheese. Sprinkle the cooked, chopped bacon over the cheese; top the bacon layer with sliced pickles. Lastly, add the reserved sheets of slider buns as the top and final layer of the sliders.1 lb. center-cut smoked bacon , Sliced hamburger dill pickles
- In a small bowl, combine the melted butter, brown sugar, Worcestershire sauce and mustard. Using a silicone basting brush, brush the butter mixture all over the sliders, letting it run down the sides. Sprinkle the sliders with sesame seeds, if using.1/3 cup unsalted butter, melted , 2 Tbs. packed dark brown sugar, 1 Tbs. Worcestershire sauce, 1-2 Tbs. spicy brown mustard , 1 Tbs. toasted sesame seeds, as garnish
- Bake the sliders, covered with foil, for 20-25 minutes, removing the foil during the last 10 minutes of the baking time. Sliders should be golden brown on top and hot throughout. Enjoy at once!
Notes
Nutrition
Nutritional Disclaimer
Chef Alli is not a dietitian or nutritionist, and any nutritional information shared is an estimate.
Originally published February 2, 2024. Updated October 29, 2024.
Sliders are so good.
You better believe it! We adore them – so fun and yummy. 🙂
Chef Alli
Now that cheeseburger looks like perfection.