Moist and Tender White Cake From a Box Mix
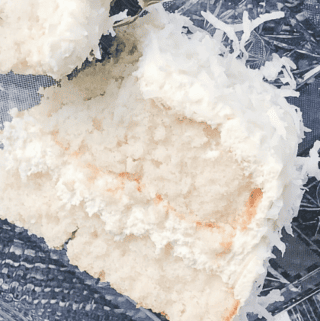
This Moist and Tender White Cake is dense and moist, yet tender and delicate. It’s everything you hope for when a slice is set before you. Made from a box mix and coconut milk, this cake is as good as a made-from-scratch cake any day – it’s that heavenly.
Servings: 12 servings
Chef Alli
Save this Recipe
Ingredients
For the Cake
- 14.25 ounce box Betty Crocker Super Moist White Cake Mix or Pillsbury Moist Supreme Cake Mix
- 1/2 cup vegetable or canola oil
- 3/4 cup canned coconut milk, from a 13.5 ounce can, such as Goya or Thai Kitchen brand (This is not cream of coconut milk as used for cocktails, fyi), stirred well
- 1/2 cup water
- 3 large egg whites
- 1 teaspoon vanilla extract
- 1/2 teaspoon almond extract
For the Frosting
- 4 ounces cream cheese, softened
- 1 tablespoon milk
- 1 cup powdered sugar
- 1/2 teaspoon vanilla extract
- 1/2 teaspoon almond extract
- tiny pinch of kosher salt
- 3 cups whipping cream
- 2/3 cup sweetened flake coconut toasted or untoasted, coconut whichever you prefer
Instructions
Make and Bake the Cake
- Preheat the oven to 350 degrees F. Grease two round 8-inch cake pans; line the bottom of each one with parchment paper, then spray the parchment with nonstick spray, as well.
- In a large mixing bowl, using an electric mixer on low, combine the cake mix with the oil, coconut milk, water, egg whites, and extracts. Beat the cake mix on medium-high speed for 2 minutes.14.25 ounce box Betty Crocker Super Moist White Cake Mix or Pillsbury Moist Supreme Cake Mix, 1/2 cup vegetable or canola oil, 3/4 cup canned coconut milk,, 1/2 cup water, 3 large egg whites, 1 teaspoon vanilla extract, 1/2 teaspoon almond extract
- Divide the cake batter evenly between the two prepared pans, smoothing out the batter on top of each one. Using both hands, pick up each pan and gently tap it on the counter a bit so that any bubbles in the batter are released.
- Bake the cakes, uncovered, on the center oven rack for 25-30 minutes or until a cake tester inserted into the center comes out clean. Let the cakes cool completely. (If you are working ahead, the cakes may be chilled at this point until you are ready to frost them.)
Prepare the Frosting
- Meanwhile, prepare the frosting by placing the cream cheese into a large mixing bowl. Using an electric mixer, beat the cream cheese for a few seconds until it becomes smooth and creamy, beating in the milk, powdered sugar, extracts, and salt.4 ounces cream cheese, softened, 1 tablespoon milk, 1 cup powdered sugar, 1/2 teaspoon vanilla extract, 1/2 teaspoon almond extract
- Continuing to beat the cream cheese mixture, slowly pour in the whipping cream. Beat the frosting until it's glossy and stiff peaks form. **The frosting should be spreadable, but stiff enough to hold its shape.3 cups whipping cream
Assemble and Frost the Cake
- Place a cooled layer cake onto a cake pedestal or platter, rounded-side-down and flat-side-up. Top with not quite half of the prepared frosting, spreading it evenly over the top and sides of the cake. Sprinkle half of the coconut over the top of the frosted cake layer.2/3 cup sweetened flake coconut
- Add the second cooled cake, this time placing it flat-side-down and rounded-side-up, on top of the first layer cake that you just frosted.
- Spread the remaining frosting over the top and the sides of the second layer, smoothing it evenly all over, as needed. Top the cake with the remaining coconut.
- Refrigerate the cake to chill for 6-8 hours. As the cake chills, it will absorb moisture from the frosting, making it even more moist and delicious.
Notes
- Cover the layer cakes with foil as soon as they come out of the oven. This is a trick my Grandma Lucille taught me. The foil forces the condensation from the heat down into your cake, making it deliciously moist. I do this with all my cakes!
- You can double this recipe to make 4 layer cakes. I do this all the time, freezing the extra two cakes to use at a later time. That way, all you have to do is thaw the cakes and frost them and that saves tons of time.
- This cake gets better and better, the longer it rests in the fridge because the cake absorbs moisture from the whipped cream frosting. I like to chill it at least 8 hours before serving.
- The recipe instructs to use 8-inch cake pans, but if you’ve only got 9-inch cake pans to work with, they will be fine. Your finished cake just won’t be quite as tall since each layer won’t be as thick.
Nutrition
Calories: 576kcalCarbohydrates: 50gProtein: 5gFat: 41gSaturated Fat: 28gCholesterol: 93mgSodium: 384mgPotassium: 146mgFiber: 1gSugar: 30gVitamin A: 1017IUVitamin C: 1mgCalcium: 147mgIron: 1mg
Tried this recipe?Let us know how it was!