
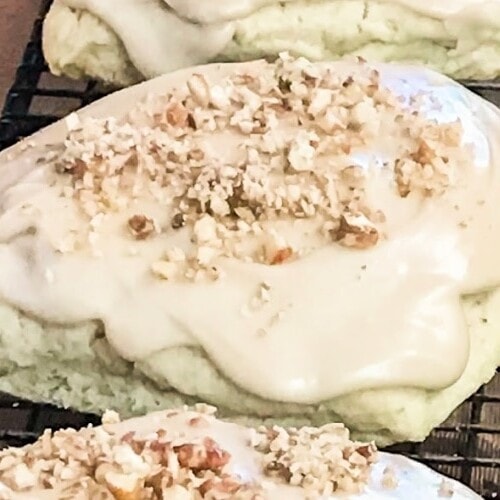
Topped with sweet icing and chopped pecans, these crumbly, buttery, tender Maple Pecan Scones are fantastic served with a cup of hot tea or coffee.
Serve these on a cool, Autumn morning or for St. Patrick’s Day.

Maple Pecan Scones Recipe
I love crumbly, buttery, and tender scones.
This recipe makes the perfect dense texture scone and then I like to drizzle it with as much maple frosting as I feel like.
Save this Recipe
Enter your email address and we will send you this recipe to your mailbox for easy reference! Plus, we will send you our latest recipes every week!
Make a big batch, then freeze the dough or bake the scones and freeze in an air-tight container to reheat later.
My Aunt Marylou introduced me to scones.
She fell in love with the afternoon celebration of tea when visiting England and she taught me to enjoy the custom as well.
So, of course, that’s where scones came into the picture – I was immediately smitten!
Of all the scones I’ve enjoyed, these are my absolute fav and I make them all the time for my family and close friends.
Ingredients you need to make this recipe
Scones
- Flour
- Sugar
- Butter
- Egg
- Heavy cream or buttermilk
- Baking powder
- Chopped pecans (optional)
- Kosher salt
Icing
- Confectioners’ sugar
- Milk
- Butter
- Brewed coffee
- Maple flavoring or extract

How to make maple pecan scones
Preheat the oven to 350 degrees F.
In a large bowl, combine the flour, granulated sugar, baking powder, salt, and finely chopped pecans.
Add the butter chunks to the flour mixture.
Using a pastry blender (or a knife and fork) cut the butter pieces into the flour mixture until it resembles crumbs.
Combine the egg and cream together and then stir this into into the flour mixture.
Take care not to over-mix the dough.
Turn the dough onto a lightly floured work surface.
The dough may be kind of crumbly at this point but don’t worry.
Push the mixture into a large bundle, then form it into a disc of dough using your hands.
Use your favorite rolling pin to flatten the disc into an 8-inch or 9-inch circumference, about 3/4-inch thick.
With a sharp knife or a bench scraper, cut the dough into 8 equal-size wedges.
Transfer the wedges onto a greased baking sheet.
Bake the scones on the center rack of the preheated oven for 22-26 minutes or until the scones are golden brown and set to the touch as the center.
Remove the scones from the baking sheet to a cooling rack.
Allow them to cool completely.
While the scones are cooling, combine the icing ingredients together in a large mixing bowl.
Beat or mix the icing until smooth.
Frost the cooled scones, by drizzling them with icing.
While the icing is still soft, sprinkle with finely chopped pecans then allow the icing to set.
Serve the scones with a hot cup of tea or coffee.
Can I freeze scones?
You sure can, and there are a couple of different ways.
I like to make the dough through the step of where you cut them into triangles.
At that point, I freeze them to bake later.
Or, you can go ahead and bake the scones. Once cooled, freeze them and glaze later when they’ve thawed and you’re ready to serve.
How is a scone different than a muffin?
Scones are flour-based treated baked on a baking sheet. They have a texture similar to biscuits.
They are flatter and wider, often triangular in shape, while muffins are perfectly round since they haven been baked in a muffin tin .
Muffins are more cake-like in texture.
What’s the difference between a scone and biscuit?
Scones are typically made with cream and eggs and are sweeter, a bit drier in texture.
They may contain fruit and are often frosted.
Biscuits, on the other hand, are most often made with buttermilk and no eggs. They are soft, flaky, and are not sweet in flavor like scones.
How are British and American scones different from one another?
British and American scones are quite different in nature.
American scones come in lots and lots of different flavors and often made with fruits. British scones are more simple and made with fewer ingredients.
American scones are designed to be eaten alone since they are sweeter and almost always have a light frosting or a drizzle of icing on top.
British scones are more plain in flavor profile, made to be topped with sweet jams, clotted cream, or lemon curd.
British scones are also quite different in shape. Instead of the triangular shape of American scones, British scones look much like very tall and very round American biscuits.
Which tools are helpful when making and baking scones?
Pastry blender – this kitchen tool works great for getting uniform pieces of butter blended into flour to make dough. I use my pastry blender for making small batches of dough and my food processor for making larger batches.
Food processor – A food processor makes the job of making dough and pie crust quick and easy….all at the push of a button. I have an 11-cup Cuisinart food processor that I use all the time. Yes, it’s a bit of an investment, but also a tool that will probably last you a lifetime.
Rolling pin – My rolling pin of preference is a French 16-inch wooden rolling pin; the tapered design makes it easy to maneuver when rolling out dough.
More Favorite Recipes to Enjoy
- NO-BAKE LEMON CHEESEBAKE BITES
- CHOCOLATE CHUNK SNICKERS BAR COOKIES
- OOEY-GOOEY WARM BROWNIE COBBLER
- AMAZING INSTANT POT APPLE CAKE WITH RUM SAUCE
- STRAWBERRY ANGEL DESSERT
- KRINGLE CRESCENT ROLL DESSERT
Maple Pecan Scones
Ingredients
Scones
- 3 cups all-purpose flour
- 1/2 cup granulated sugar
- 1 Tbs. baking powder
- 3/4 tsp. kosher salt
- 1 cup unsalted butter, chilled, cut into small chunks
- 1/3 cup finely chopped toasted pecans
- 1 large egg
- 3/4 cup heavy cream or buttermilk
- finely chopped toasted pecans, for garnishing, optional
Maple Icing
- 1 lb. confectioners’ sugar
- 1/4 cup milk
- 4 Tbs. unsalted butter, melted
- 1 splash strongly brewed coffee
- Dash of salt
- 2 tsp. maple flavoring or maple extract
Instructions
Make and Bake the Scones
- Preheat oven to 350 degrees F.
- In a large mixing bowl, stir together the flour, granulated sugar, baking powder and salt; add the butter chunks to the flour mixture. Using a pastry blender (or a knife and a fork), cut the butter chunks into the flour mixture until it resembles crumbs. **See Notes
- Now finely chop the pecans and stir them into the flour mixture. Mix the egg and cream together; add this mixture to the dry ingredients and stir until just combined.
- Turn the dough mixture onto lightly floured work surface. The dough may be rather crumbly at this point, but don't worry. Using your hands, push the mixture together into a large bundle, then form it into a disc of dough.
- Use your favorite rolling pin to flatten the disc into an 8-inch or 9-inch circumference, about 3/4-inch thick. With a sharp knife or a bench scraper, cut the dough into 8 equal-size triangular wedges.
- Transfer the scones to a greased rimmed baking sheet. Bake the scones for 22 to 26 minutes, until they're just golden brown and set to the touch at the center. Remove scones from the baking sheet to a cooling rack and cool completely.
Make the Maple Icing
- While the scones are cooling, combine the frosting ingredients together in a large mixing bowl, beating until smooth. **If needed, adjust the liquid ingredients to make the desired consistency. Frost the cooled scones, drizzling them with icing; while the icing is still soft, sprinkle with finely chopped pecans then allow the icing to set. Serve with a hot cup of tea or strong coffee on a chilly Autumn morn. Enjoy!
Notes
Nutrition


Can the maple icing be ok without the coffee?
Hi Donna –
Sure will! The coffee just enhances the maple flavors a bit more. It’s still delicious without the coffee. You may have to add a bit more liquid if you don’t add the coffee to get the icing the consistency you’d prefer. Please let me know if you enjoy this recipe – I adore these scones!
Your fan,
Chef Alli